Intervențional — Utilizarea sistemului de biopsie Bonopty (MCB)
Sursă și prelucrare editorială
- Proveniență
- 1 referință declarată
- Fidelitatea preluării
- Nedocumentată
- Revizuire medicală
- Nedocumentată
Referințele declarate nu confirmă singure fidelitatea preluării sau aprobarea protocolului pentru utilizare locală.
Detalii despre surse și verificări
MCB Radiology — Bonopty How To
- Ediție / versiune a sursei
- Neprecizată
- Pagină / secțiune
- Pagini: 1–16
- Relația cu protocolul
- Document original importat integral; atribuirea autorilor rămâne cea din PDF.
- Data consultării
- 2026-09-27
Prelucrarea acestei pagini
- Mod de prelucrare
- Titlu și navigare în română; documentul sursă în engleză.; PDF original integral, previzualizare și text extras automat; fără completarea parametrilor clinici lipsă.
- Adaptări față de sursă
- Nedocumentate; absența evidenței nu confirmă o preluare integrală.
- Responsabil pentru prelucrare
- Neprecizat
- Atribuire existentă în pagină
- MCB Radiology (portalul sursă). Această atribuire nu identifică automat autorul sursei sau revizorul medical.
- Versiunea paginii
- mcb-9e8f392c03a1
- Actualizare declarată a paginii
- 2026-09-27 — distinctă de revizuirea medicală.
Verificarea fidelității: Nedocumentată
Revizuirea medicală: Nedocumentată
Documentul original MCB — Utilizarea sistemului de biopsie Bonopty
Ghid procedural · 16 pagini · consultat la 2026-09-27.
Descarcă PDF-ul integral · Sursa MCB · Catalogul MCB pentru această modalitate
Instrucțiunile, valorile și ilustrațiile din documentul original sunt păstrate în engleză. Titlul și navigarea sunt în română.
Pagina 1
Pagina 2
Pagina 3
Pagina 4
Pagina 5
Pagina 6
Pagina 7
Pagina 8
Pagina 9
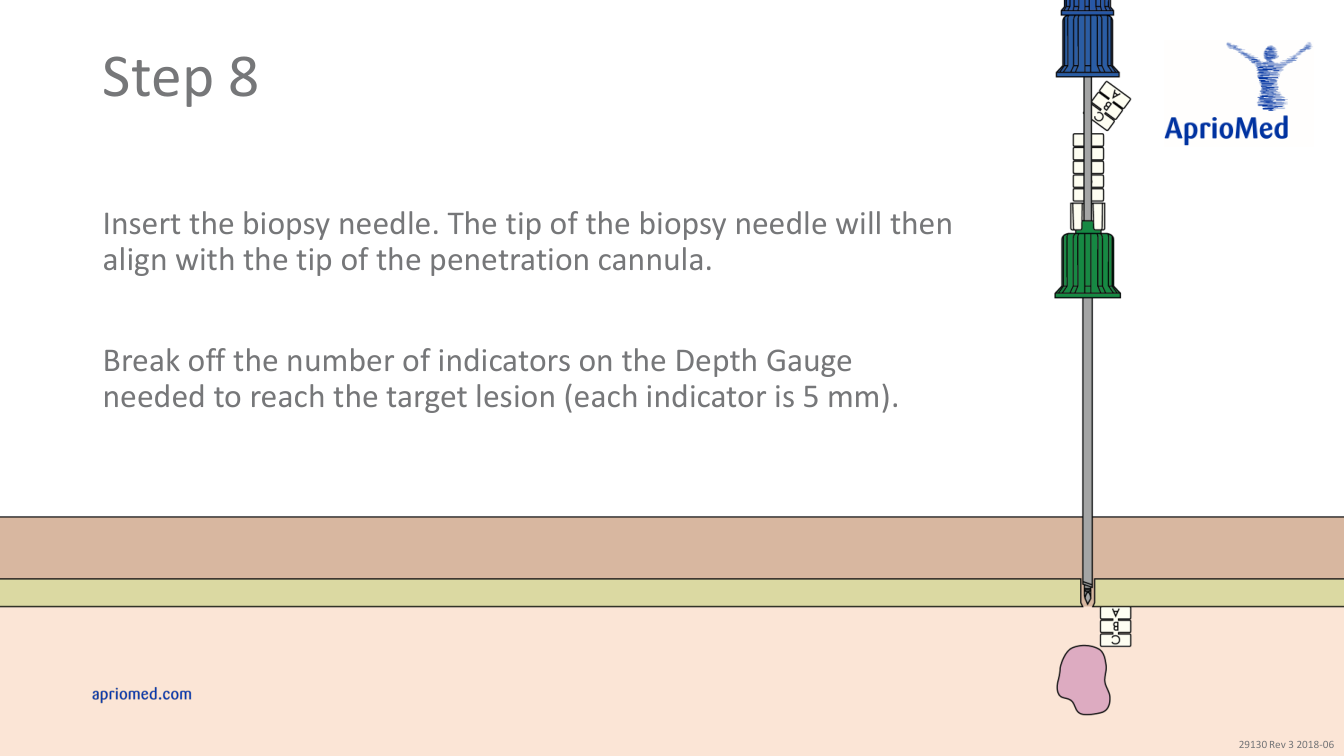
Pagina 10
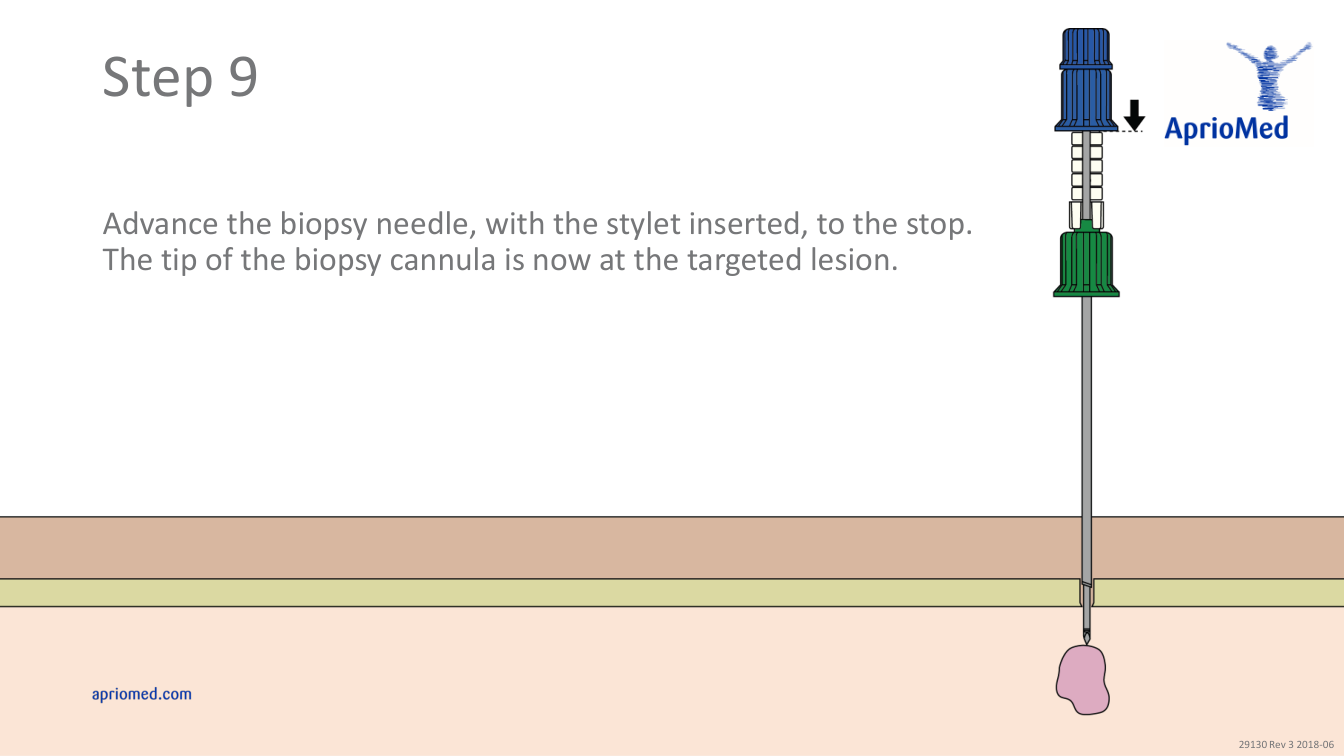
Pagina 11
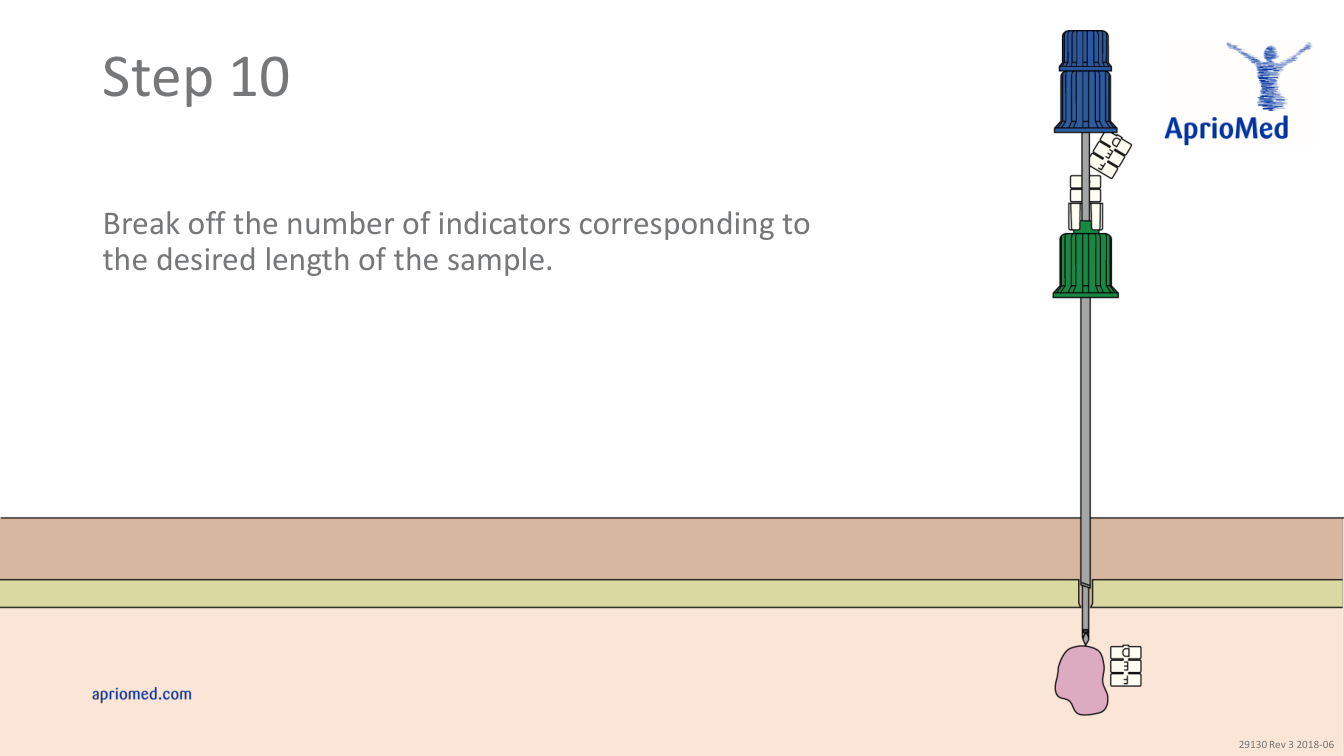
Pagina 12
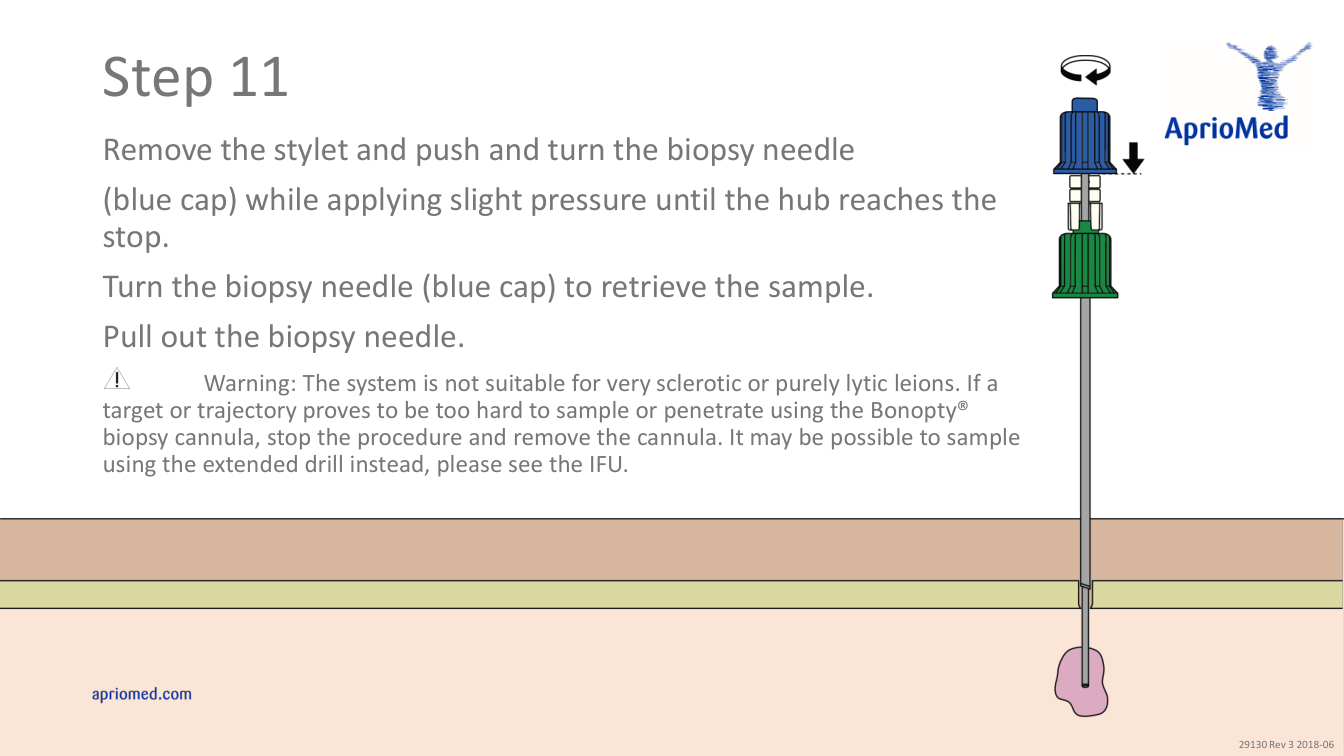
Pagina 13
Pagina 14
Pagina 15
Pagina 16

Textul documentului original
Pagina 1 — text în engleză
Step by step description - Use of Bonopty® Bone Biopsy System, 14 gauge Before use, please read the Instructions For Use which accompany the product for indications, contraindications, warnings and precautions. Caution: Federal law restricts this device to sale by or on the order of a physician. 29130 Rev 3 2018-06
Pagina 2 — text în engleză
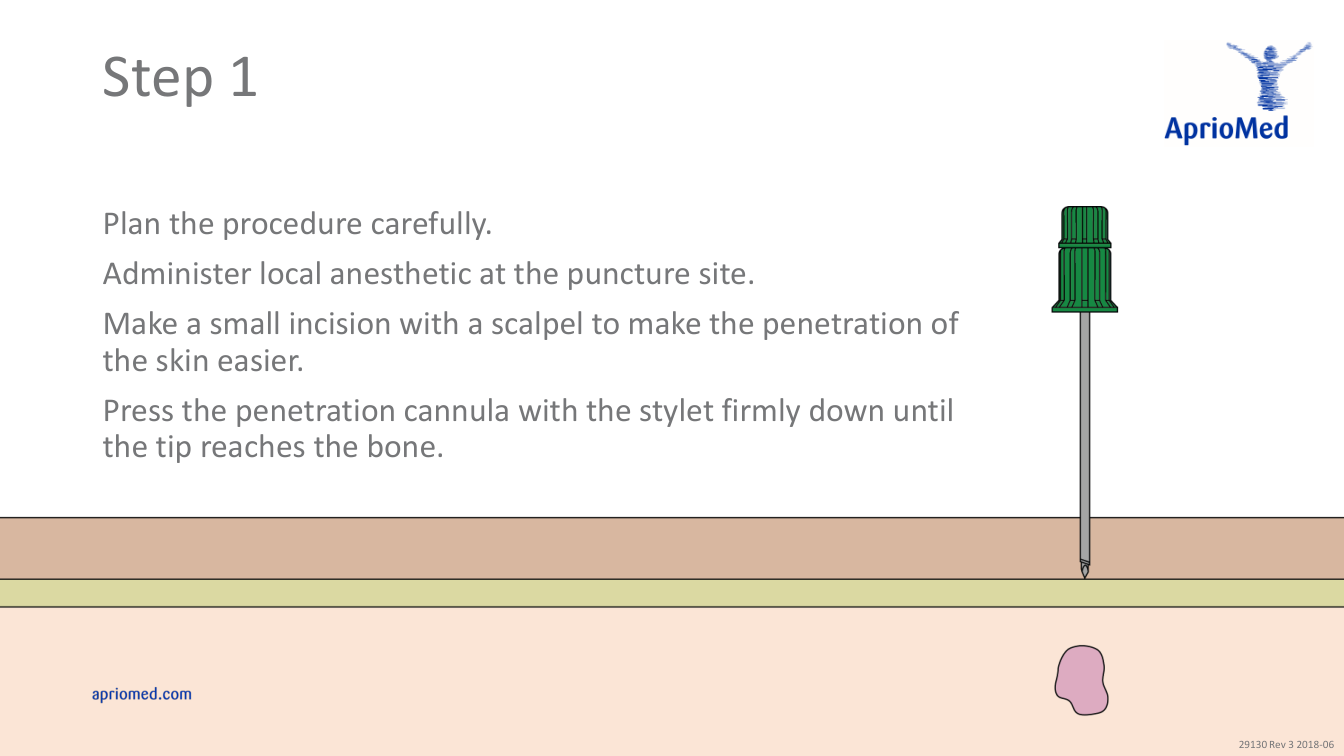
Step 1 Plan the procedure carefully. Administer local anesthetic at the puncture site. Make a small incision with a scalpel to make the penetration of the skin easier. Press the penetration cannula with the stylet firmly down until the tip reaches the bone. 29130 Rev 3 2018-06
Pagina 3 — text în engleză
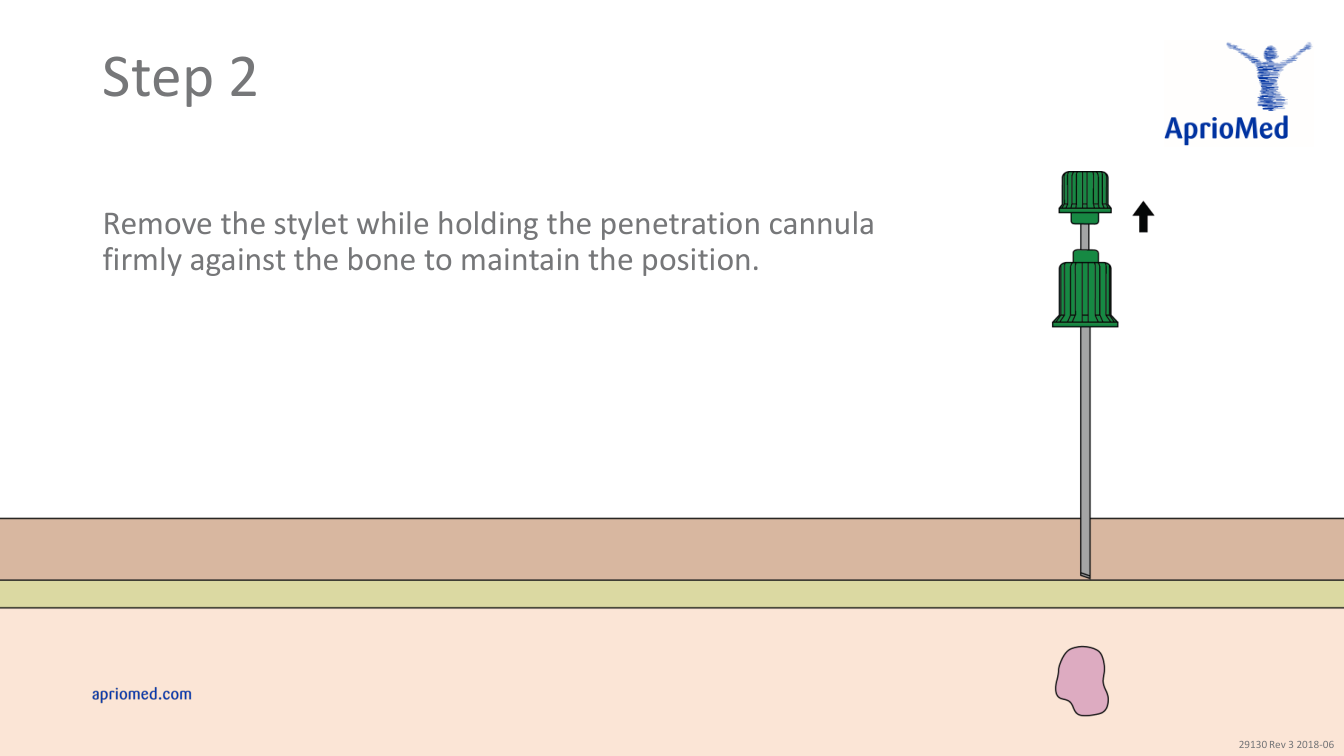
Step 2 Remove the stylet while holding the penetration cannula firmly against the bone to maintain the position. 29130 Rev 3 2018-06
Pagina 4 — text în engleză
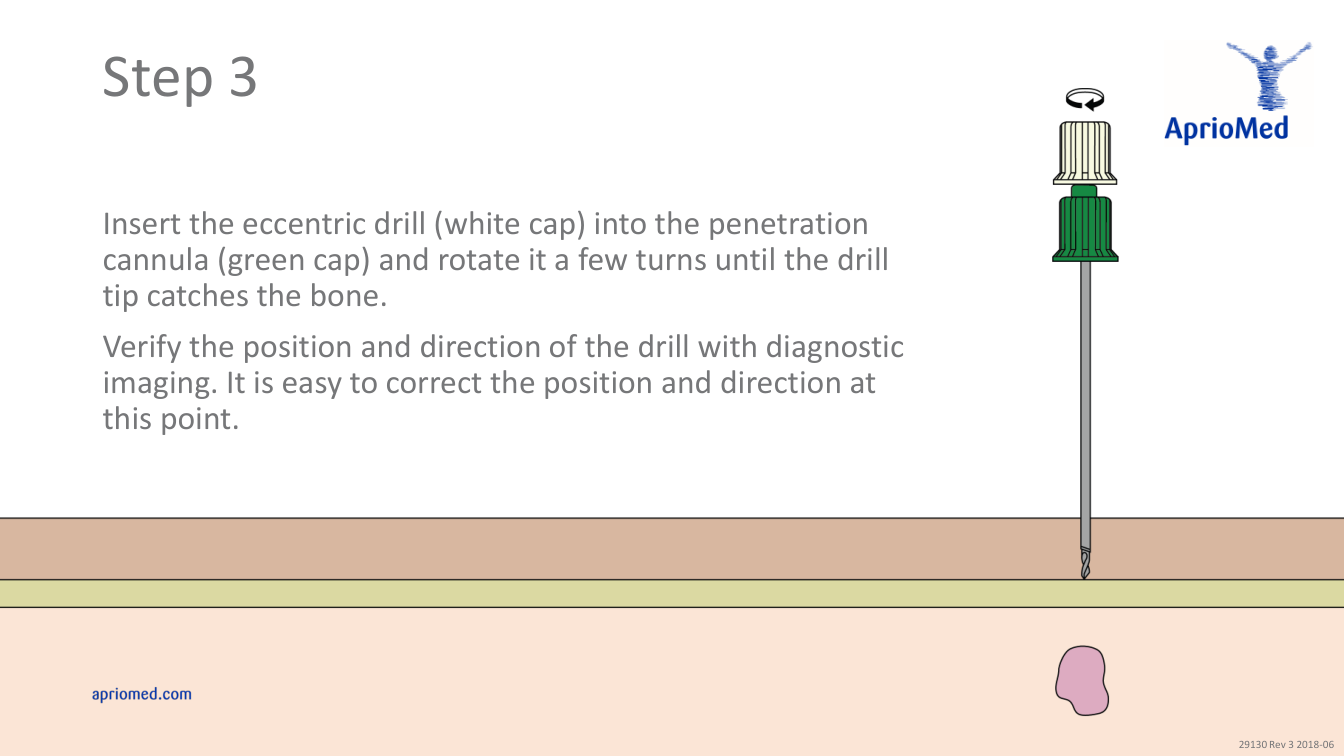
Step 3 Insert the eccentric drill (white cap) into the penetration cannula (green cap) and rotate it a few turns until the drill tip catches the bone. Verify the position and direction of the drill with diagnostic imaging. It is easy to correct the position and direction at this point. 29130 Rev 3 2018-06
Pagina 5 — text în engleză
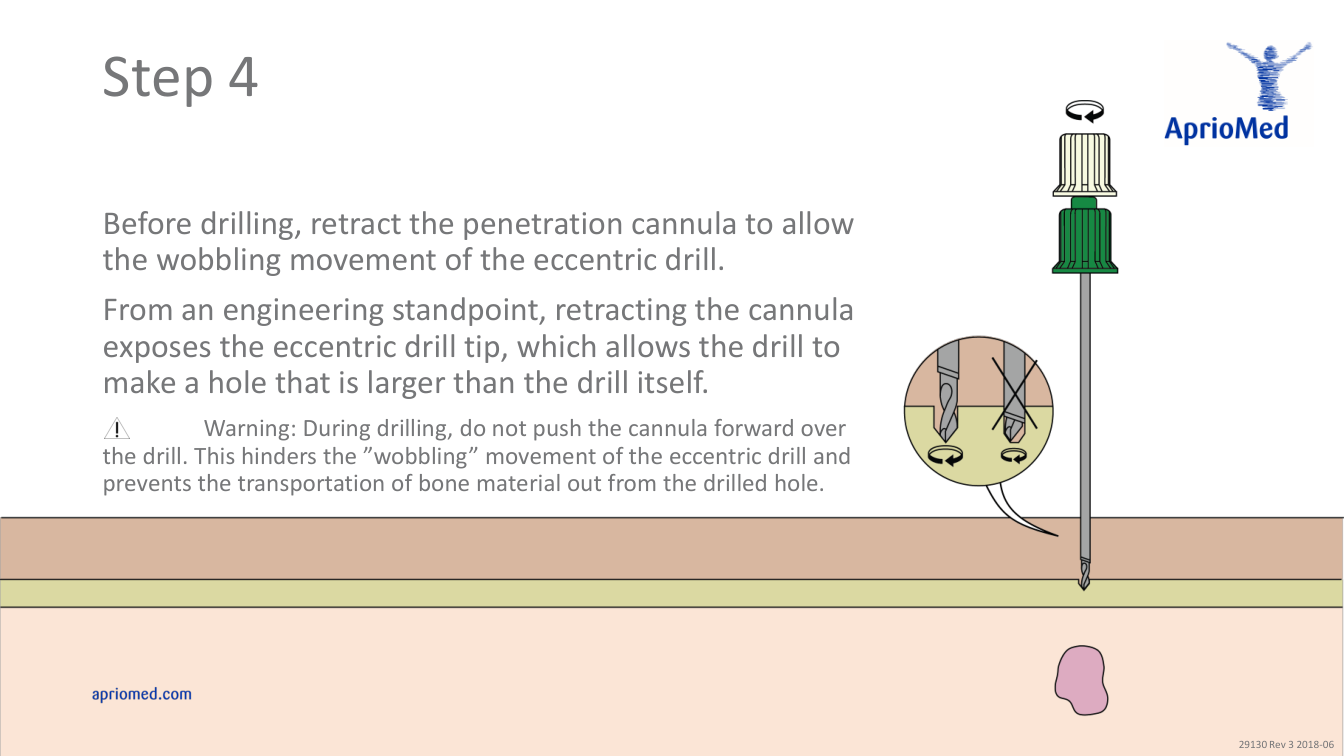
Step 4 Before drilling, retract the penetration cannula to allow the wobbling movement of the eccentric drill. From an engineering standpoint, retracting the cannula exposes the eccentric drill tip, which allows the drill to make a hole that is larger than the drill itself. Warning: During drilling, do not push the cannula forward over the drill. This hinders the ”wobbling” movement of the eccentric drill and prevents the transportation of bone material out from the drilled hole. 29130 Rev 3 2018-06
Pagina 6 — text în engleză
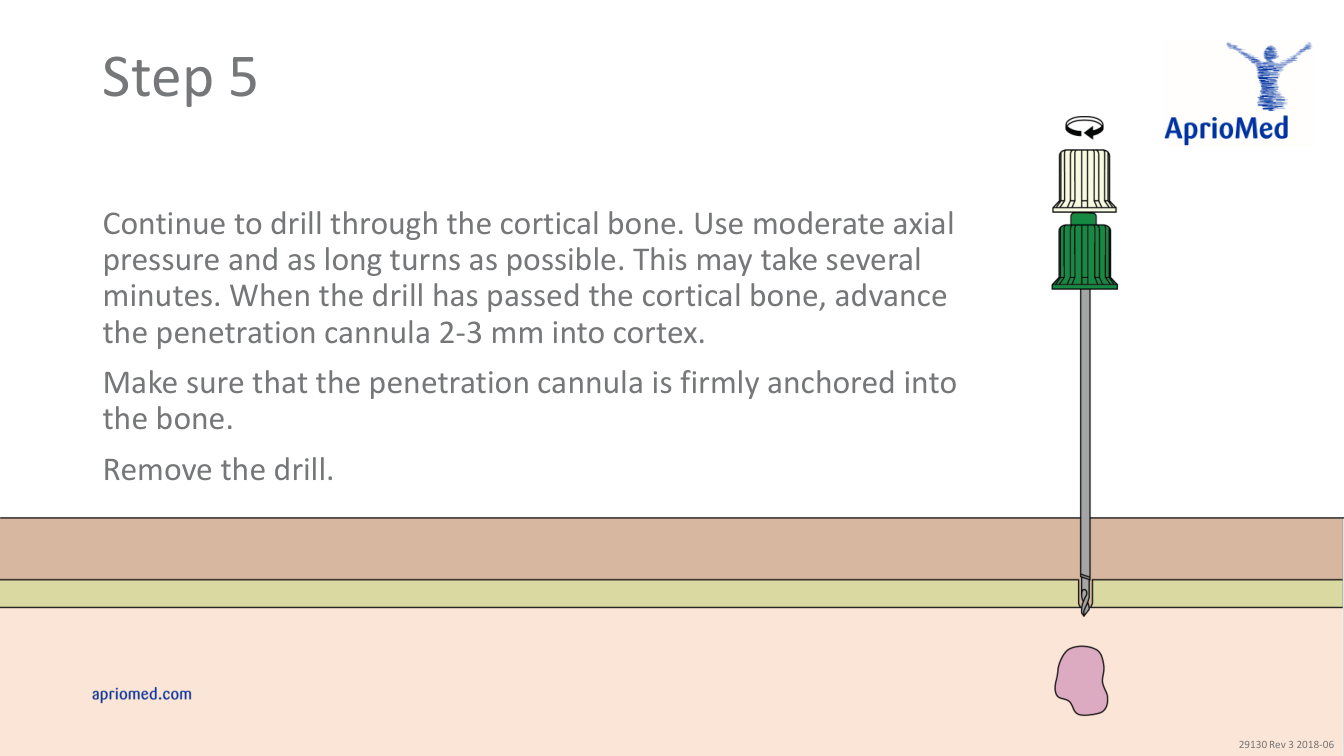
Step 5 Continue to drill through the cortical bone. Use moderate axial pressure and as long turns as possible. This may take several minutes. When the drill has passed the cortical bone, advance the penetration cannula 2-3 mm into cortex. Make sure that the penetration cannula is firmly anchored into the bone. Remove the drill. 29130 Rev 3 2018-06
Pagina 7 — text în engleză
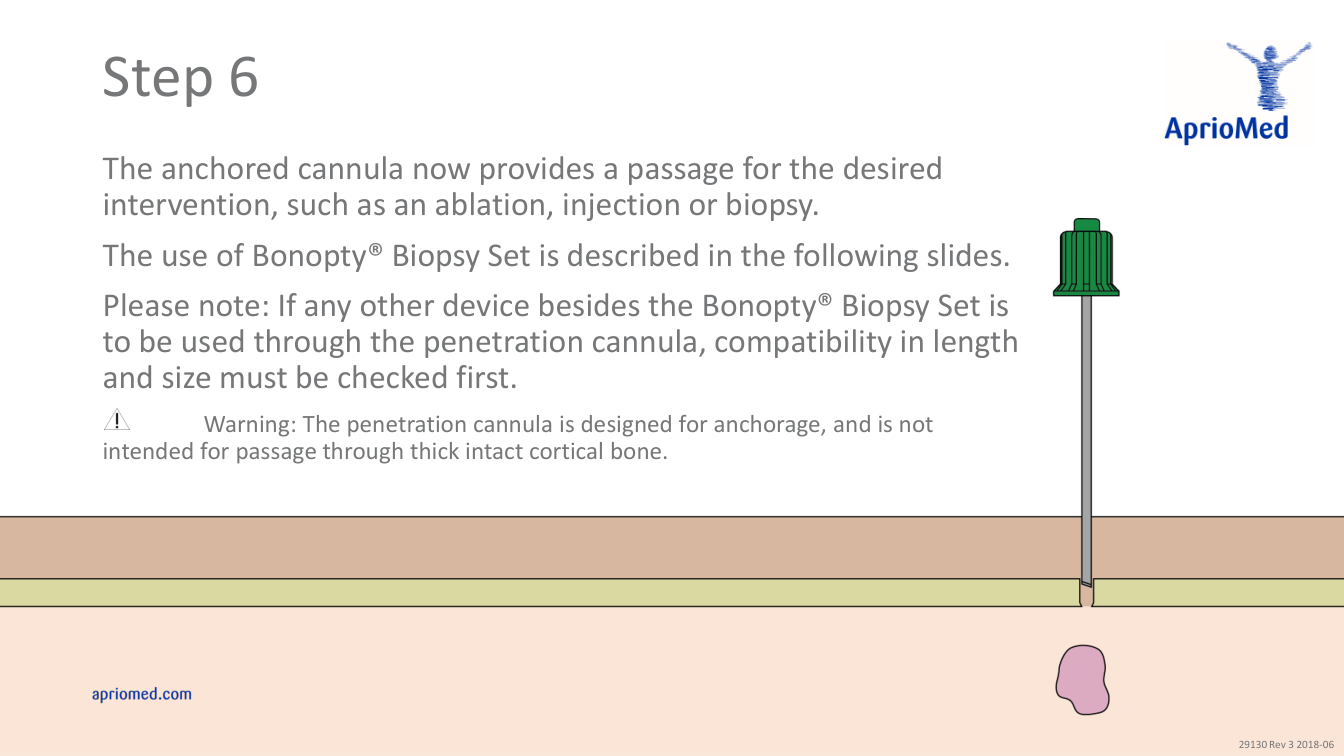
Step 6 The anchored cannula now provides a passage for the desired intervention, such as an ablation, injection or biopsy. The use of Bonopty® Biopsy Set is described in the following slides. Please note: If any other device besides the Bonopty® Biopsy Set is to be used through the penetration cannula, compatibility in length and size must be checked first. Warning: The penetration cannula is designed for anchorage, and is not intended for passage through thick intact cortical bone. 29130 Rev 3 2018-06
Pagina 8 — text în engleză
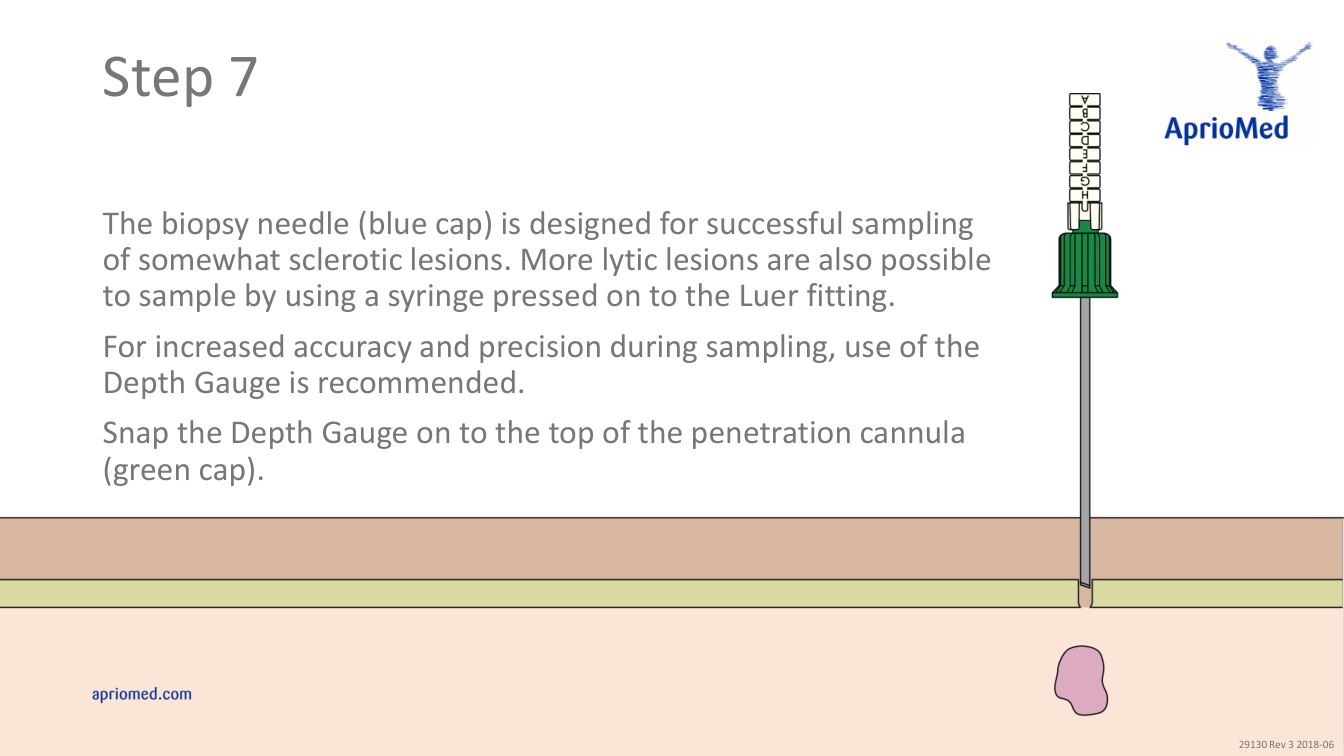
Step 7 The biopsy needle (blue cap) is designed for successful sampling of somewhat sclerotic lesions. More lytic lesions are also possible to sample by using a syringe pressed on to the Luer fitting. For increased accuracy and precision during sampling, use of the Depth Gauge is recommended. Snap the Depth Gauge on to the top of the penetration cannula (green cap). 29130 Rev 3 2018-06
Pagina 9 — text în engleză
Step 8 Insert the biopsy needle. The tip of the biopsy needle will then align with the tip of the penetration cannula. Break off the number of indicators on the Depth Gauge needed to reach the target lesion (each indicator is 5 mm). 29130 Rev 3 2018-06
Pagina 10 — text în engleză
Step 9 Advance the biopsy needle, with the stylet inserted, to the stop. The tip of the biopsy cannula is now at the targeted lesion. 29130 Rev 3 2018-06
Pagina 11 — text în engleză
Step 10 Break off the number of indicators corresponding to the desired length of the sample. 29130 Rev 3 2018-06
Pagina 12 — text în engleză
Step 11 Remove the stylet and push and turn the biopsy needle (blue cap) while applying slight pressure until the hub reaches the stop. Turn the biopsy needle (blue cap) to retrieve the sample. Pull out the biopsy needle. Warning: The system is not suitable for very sclerotic or purely lytic leions. If a target or trajectory proves to be too hard to sample or penetrate using the Bonopty® biopsy cannula, stop the procedure and remove the cannula. It may be possible to sample using the extended drill instead, please see the IFU. 29130 Rev 3 2018-06
Pagina 13 — text în engleză
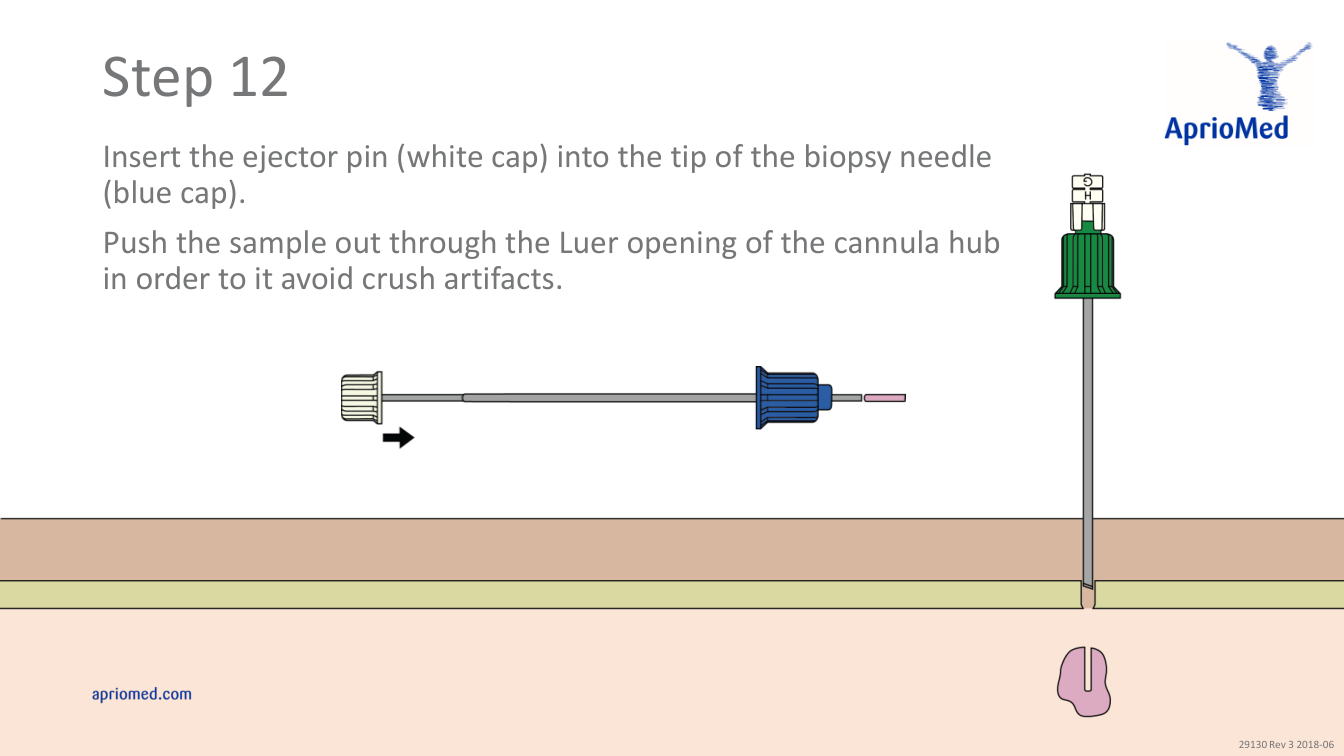
Step 12 Insert the ejector pin (white cap) into the tip of the biopsy needle (blue cap). Push the sample out through the Luer opening of the cannula hub in order to it avoid crush artifacts. 29130 Rev 3 2018-06
Pagina 14 — text în engleză
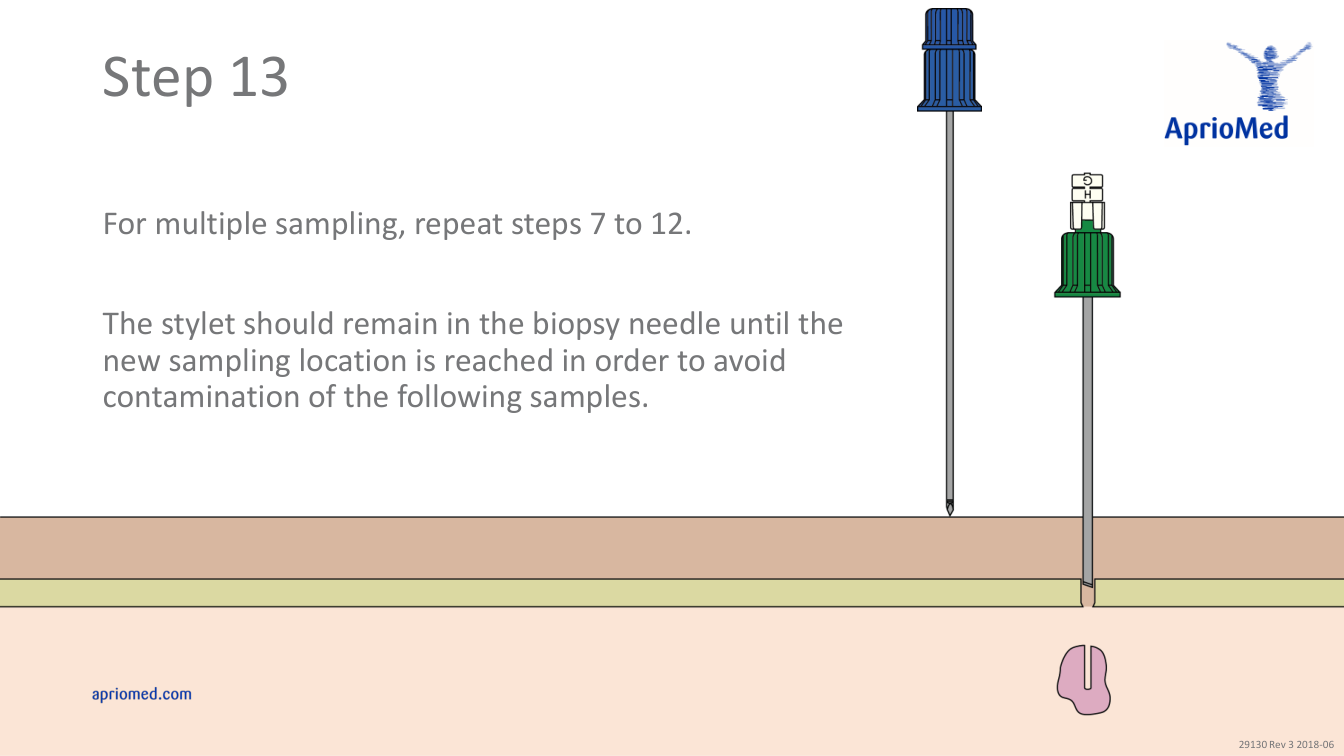
Step 13 For multiple sampling, repeat steps 7 to 12. The stylet should remain in the biopsy needle until the new sampling location is reached in order to avoid contamination of the following samples. 29130 Rev 3 2018-06
Pagina 15 — text în engleză
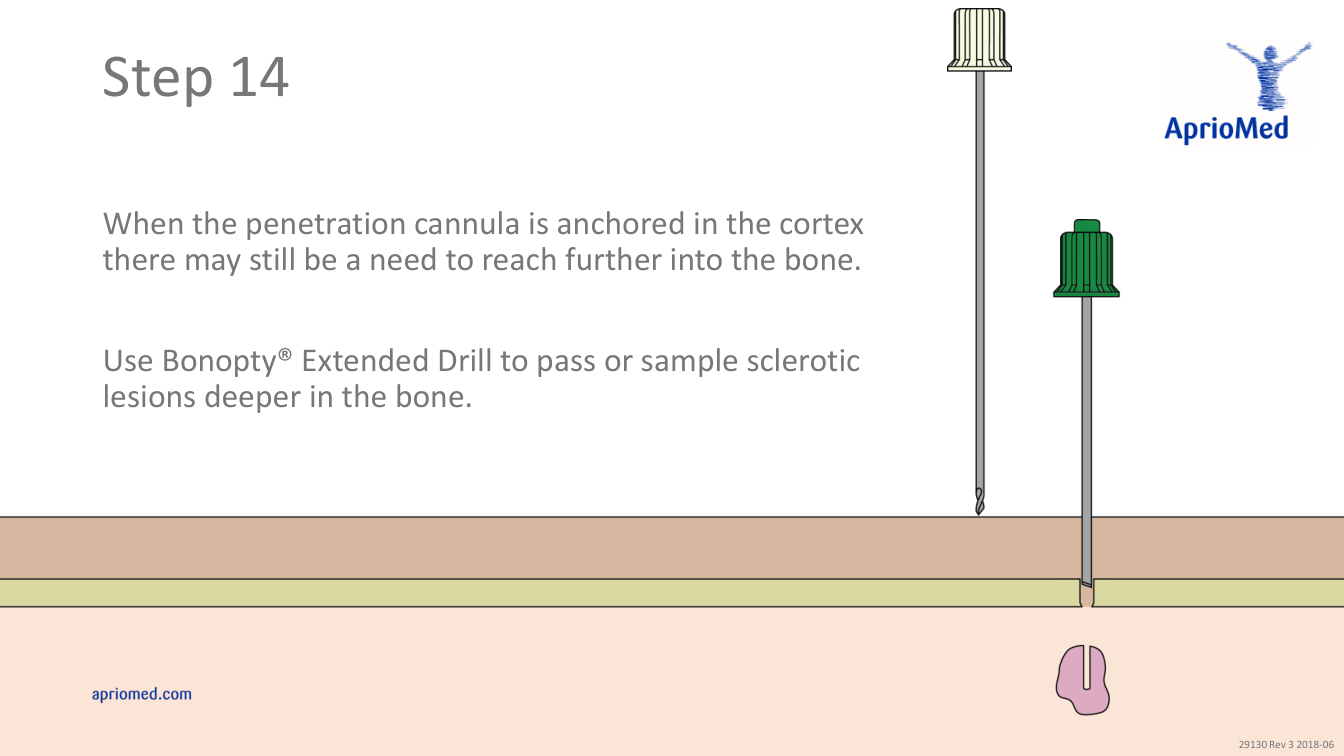
Step 14 When the penetration cannula is anchored in the cortex there may still be a need to reach further into the bone. Use Bonopty® Extended Drill to pass or sample sclerotic lesions deeper in the bone. 29130 Rev 3 2018-06
Pagina 16 — text în engleză
About AprioMed develops, manufactures, markets and sells innovative medical devices and related services within the field of interventional radiology. We aim to deliver, in close collaboration with healthcare practitioners, innovative, quality tools to achieve optimal solutions for radiologists worldwide. 29130 Rev 3 2018-06